

It’s completely normal to worry about what happens to your roof during a solar installation. After all, your roof’s job is to protect your home from outside elements, and the idea of drilling holes into it can sound risky.
Modern solar installations rely on engineered mounting systems and proven waterproofing techniques designed to protect your roof for decades. In this article, we’ll explain when roof penetrations are necessary, how they’re sealed, and why a properly installed solar system won’t cause leaks or damage.
1. When Solar Installations Require Roof Penetrations?
Solar panels must be securely attached to your roof so they can withstand decades of Canadian weather, including wind, snow loads, and temperature swings. But not all roof-mounted solar installations require roof penetrations. For example, if you have a standing-seam metal roof, you won’t require any! In this case, we use specialized clamps that interface with the railing system instead. Likewise, if you have a flat roof, ballasted solar mounting system with concrete blocks are usually the way to go.
However, roofs made of corrugated metal, asphalt shingles, rubber etc. do require penetrations for proper attachment. Roof penetrations are typically required to:
- Secure the mounting hardware to the roof
- Route electrical wiring from the panels into your home
- Support temporary safety equipment during installation
The exact number of penetrations varies based on roof size, layout, and system design, but each one serves a specific purpose and is carefully sealed.
2. How a Solar Mounting System Works
On a typical shingle roof, after checking (and double checking!) your measurements, the mounting process starts by placing one of the following:
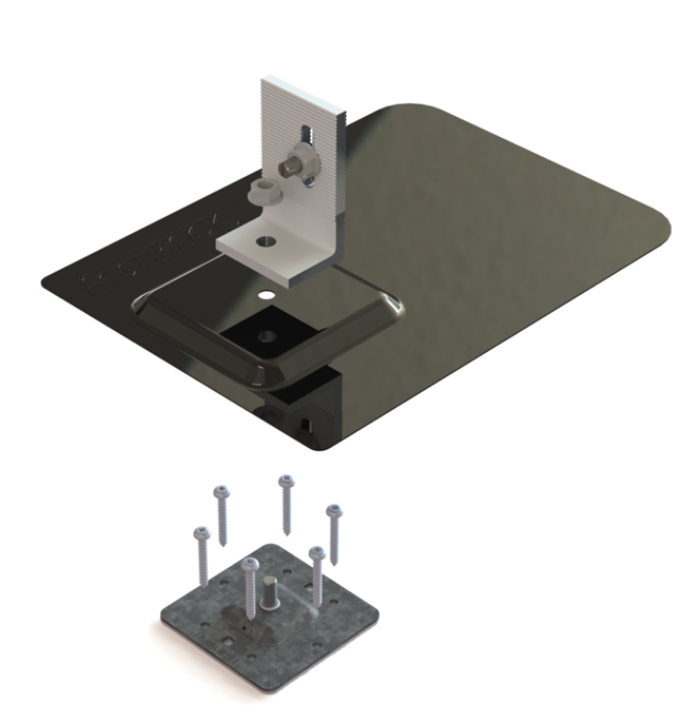
- For Shingles: a metal plate with butyl seal is secured to the roof using 6 screws, and then covered with an anodized aluminum flashing (more info below)
- For Corrugated metal: a single large lag bolt is inserted into a pre-drilled hole in the truss and has a rubber gasket for waterproofing.
- Wood shakes, rubber and clay tile roof mounting systems are each unique but follow one of the two principles of attachment outlined above.
Regardless of the mounting system, what happens next is always the same:
An L-foot is then secured to the mount, creating a strong connection point above the roof surface. Next, aluminum rails are fixed to the L-feet (L-foots? I don’t know – it's a big debate among our crew) and aligned carefully to create a straight, level framework. Finally, the solar panels are clamped to those rails, forming a secure system designed to handle wind, snow, and decades of outdoor exposure.
Most of our installations are on shingled roofs, so we work mainly with FastRack Ultra, a mounting system locally and meticulously designed and manufactured in Canada. Having the UL 2703 certification, its sleek, durable and 100% waterproof design ensures top-notch performance for Canadian weather, as well as a 25-year warranty backing.
3. What Makes FastRack Amazing?
In short: The Double Mechanical Seal
What makes FastRack a no-brainer option is their versatile Talon XE. Its design allows us to mount directly to the roof sheathing or securely into a roof truss, and it comes with a double-mechanical seal:
Primary Seal: The Butyl Rubber Gasket: A galvanized steel base plate (or talon), that includes a butyl rubber gasket on its underside. When the fastener is driven into the roof, the gasket compresses and expands, creating a watertight seal at the same moment the hole is made.
Secondary Protection: Aluminum Flashing: An anodized aluminum flashing is then installed over the talon and tucked underneath the shingle above it. This allows water and debris to flow naturally down the roof, just as it would if the solar mount weren’t there.
4. What Are Wiring Holes?
To bring the electricity from your solar panels into your home, many installers just run a conduit down the side of the home. We only do that when there is no other option. Our preference is to use one or a few small roof penetrations to bring the wires into the attic and down to the electrical panel through the house walls. These penetrations are sealed using a weatherproof junction box designed specifically for shingle roofs. The box is securely fastened and sealed with roofing‑grade materials to ensure long‑term protection.
For both performance and aesthetics, our junction boxes are typically installed underneath a solar panel, keeping them protected from direct exposure and out of sight.
5. Do Temporary Safety Anchors Damage Your Roof?
Some installations require temporary safety anchors so crews can work safely on your roof. While other installers might drill these straight into your roof and cover up the holes with roof tar afterwards, our process is as follows:
- We gently and temporarily remove one or two shingles from the peak of the roof
- The anchor is fastened into the roof structure in an area that will eventually be covered by the removed shingles
- Once installation is complete, the anchor is removed
- The drill holes are sealed with roofing sealant
- Shingles are resecured and secured with additional sealant
These penetrations are fully sealed and leave no long‑term impact on your roof. Plus, because we remove and reinstall the shingles, there is no visual evidence left behind either.
6. So… Should You Worry About Holes in Your Roof?
As you can see, a typical installation will technically require dozens or even hundreds of roof penetrations. However, instead of asking, “How many holes will be in my roof?” a better question is:
“Will those penetrations affect my roof’s ability to protect my home?”
When industry best practices are followed, the answer is simple: no.
Each penetration is carefully placed, sealed using proven methods, and designed to remain watertight for the lifetime of your solar system and beyond.
Final Thoughts
A properly installed solar system will not compromise your roof.
While roof penetrations are necessary, they’re handled with precision and are protected by redundant sealing systems that are engineered to withstand decades of exposure to the elements. The real key is choosing an installer who prioritizes quality workmanship and attention to detail.
When done right, your roof continues doing its job (that is, protecting your home) while your solar system quietly produces clean energy above it.
Thinking About Going Solar?
If you’re exploring solar for your home and want clear, honest guidance, we’re here to help.
Whether you’re early in your research or already evaluating system designs and pricing, we can walk you through what to expect, so you understand how your roof, your home, and your solar system all work together.
Reach out to start a conversation and get the clarity you need to move forward with confidence.